Dive Log DT is a new desktop application found on the Mac App Store that is designed to allow you to edit and manage your digital scuba diving logbook. Dive Log DT extends the free Dive Log Manager application to allow editing directly on your desktop and to directly download selected dive computers (see below for the exact list). You can then synchronize your log back to your mobile device using Dive Log on iOS. See our screen shots below for more information about it's features and visit the Mac App Store to purchase and download. Many new features were added for the current version 4.3.0!
We also have a sample logbook file you can download and play around with to gather more information - take a look here to try it out! If you have any problems with the software, please contact More Mobile Software support directly and we will do our best to make you happy! Also check our forums for more information posted directly by our existing customers.
We designed Dive Log DT to work hand in hand with Dive Log for iOS. You can take your iDevice to the dive site with you, enter all the information about the dive including photos and GPS information and log the dive as much as you can while there and while the information is fresh and your buddy can sign your log. Later, when you have your MacOS machine available, you can use Dive Log DT to *merge* the additional dive computer information into the entries you have already created! Just transfer your logbook from the iOS device to the desktop, merge or add the new information in, and then transfer the logbook back to your mobile!. If you are in a place without public WiFi (like maybe on a boat in the ocean!), you can still sync by setting up a WiFi between your 2 devices. Really, it's so easy to do.
 Dive Log DT is a completely new application. Mac users will recognize the model that Dive Log DT uses to display your diving logbook information.You can create and view information about your Dives, Buddies, Locations, Types of Dives, Equipment, Personal Information and Certifications (including photos), Shops, and Trips.
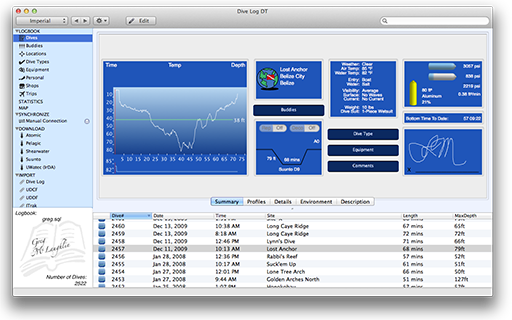
The new Dives panel has 5 different tabs:
Summary - all information at a glance
Profile - a large expandable version of the dive profiles including temperature, warnings, tank pressure, and remaining bottom time, if available.
Details - Date, Time, Location, Buddies, and Dive Metrics (now also with Pressure Groups)
Environment - set the environmental factors surrounding the dive, including weather, temperatures, and tank information
Description - Type of Dive (set multiple for Statistics), Equipment used (select multiple for Statistics), Comments, and a Buddy Signature
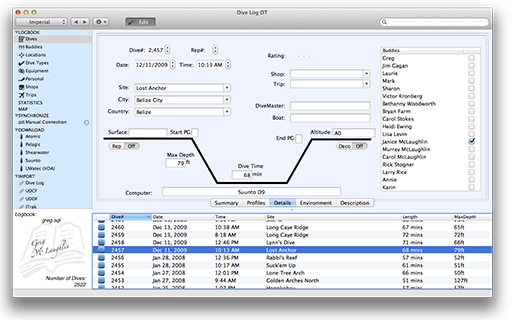
Here, the Details tab will show you a set of information about the currently selected dive. Hitting the "Edit" button above will place you into editing mode for that dive where you can modify each piece of information. Full Undo and Redo are available for each editing session. Additional information about the dive can be edited using the Environment and Description panels. Clicking the Edit button a second time will exit you out of editing mode and all changes are saved to the logbook.
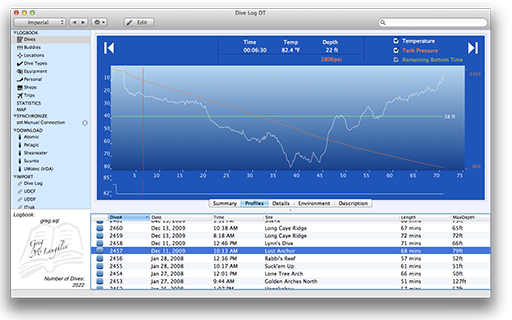
The profile tab displays a larger version of your dive profile as downloaded from a dive computer. (Either downloaded by Dive Log DT or by importing from another logbook application)
Using your mouse, you can obtain depth, time, and if supported by your dive computer, temperature, tank pressure, and remaining bottom time information for any point throughout the dive. If your dive computer gave you a warning on the dive, this is also displayed in red.
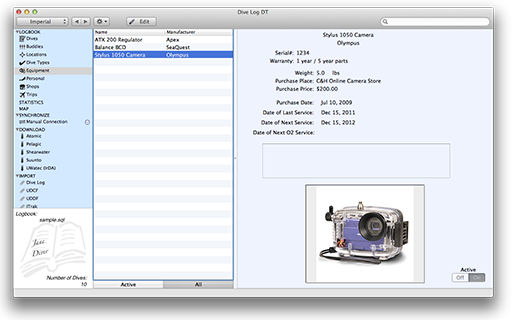 The Equipment panel shows each item of Equipment that you have added to your logbook. On a dive, you can indicate which pieces of equipment you used on that dive. Here you can edit the particulars of each piece, including adding a photo of the equipment if you desire. Simply enter into editing mode (using the Edit button), and then drag and drop a photo into the image area on the right. You can also keep track of when your equipment was last serviced, and when it is due. This is also a great place to keep track of all your photography gear and which elements you used on a particular dive, and when it needs to be serviced.
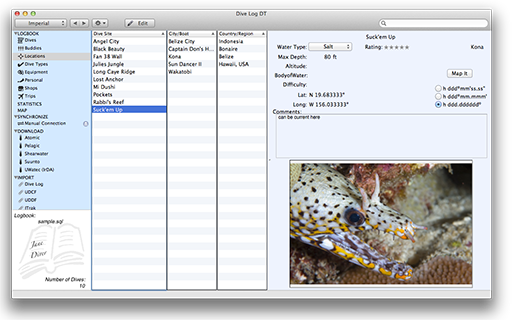 The Locations Panel shows dive site locations divided into 3 parts:
Dive Site - including a star rating, comments, GPS location, and a photo. Dive Sites with GPS locations can be viewed in a browser using Google Maps.
City/Boat - select whether the site was part of a City, Island, Liveaboard, Hotel, or Camping location as well as general comments and a photo.
Each item, including the photos, can be updated in Editing mode.
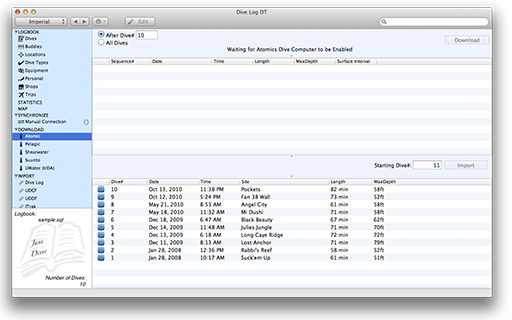
New in version 4.3 and later! We have added direct download support for selected Atomic and ScubaPro/UWatec dive computers. Under the "Download" panel, select the brand of dive computer you own. Select the "Download" item itself for online help. You can download all the dives currently on your dive computer, or a subset of them after a certain date. Download only new dives to save time.
Once the download has finished, the list of dives found on the dive computer will be shown in the top window. In that window, select one or all of the dives you want to now import into your logbook. Enter a new starting dive number to add them to the end of your logbook, or enter an existing dive number (or click on a dive in the bottom window) to merge your downloaded dive computer information into the dive you have already entered.
Sometimes your dive computer registers 2 dives (or more) when you spend "too much" time on the surface in the middle of it. You want these 2 dives to be really 1 dive for logbook purposes. There are two ways to handle this with Dive Log DT:
1) Import both of the dives into your logbook so that you have eg: Dive# 100 and Dive# 101. Go to the Dives panel and then the Detail tab and into Editing Mode. Change the dive number for Dive#101 to 100. So now you have 2 dive number 100's. This way, all the information from your dive computer is preserved.
2)
Import both of the dives into your logbook so that you have eg: Dive# 100 and Dive# 101. Go to the Dives panel and select Dive# 100 so that it is showing. Now bring up the menu (Right click or Control click) on the dive in the lower window and select the menu item "Merge Following". After answering all the popup's, the dive computer information from Dive# 100 will be merged into the dive computer information from Dive# 101 and the original Dive# 100 will be deleted. This is how you can merge two dive computer profiles together into one.
Your Cobalt came with a USB/Charger Adapter and a USB cable. Plug the USB side of the Adapter into the terminal socket on the back of the Cobalt, plug the mini end of the USB cable into the Adapter, and then plug the other end into a USB port on your Mac. Navigate the Cobalt's main menu into Settings and then to System Information. Select USB and then press the Select button again to enable USB Communication. Once your Cobalt has been enabled for USB, the "Download" button will become enabled. Click it and Dive Log Manager will start downloading dives stored on the Cobalt. Once finished, the list of dives stored on the dive computer will show in the upper window. This list of dives will remain until another download is started so you may import dives in multiple stages if you wish. They will not remain once you Quit Dive Log Manager.
(NOTE: The ScubaPro USB IrDA dongle is REQUIRED to be able to download these computers. There is no need to install any drivers)
Once you insert the ScubaPro/UWatec USB IrDA adaptor into a USB port on your Mac, the "Download" button will become enabled. Turn on your dive computer and place it's IrDA port about 3 to 6 inches or 7 to 15 centimeters away from the IrDA port on the adaptor. Make sure that the dive computer is supported in such a way that it won't move (very much) while downloading. Then click the "Download" button to start the transfer process. Dive Log DT will show a progress bar while the dive computer is being downloaded. Do not move the dive computer until the download has finished. This list of dives will remain until another download is started so you may import dives in multiple stages if you wish. They will not remain once you Quit Dive Log DT.
Some of the UWatec dive computers, such as the Galileo series, have large amounts of memory in them in order to store large amounts of dive information. It make take Dive Log DT over 10 minutes to download all of the memory, so you may need to be patient.
Some of the UWatec dive computers, such as the Smart series, can sometimes get "lost" in the middle of a transfer and become unresponsive. If you do not see the progress bar making any progress for 20 to 30 seconds, the dive computer may be stuck. If this happens, you can click the cancel button and then click the download button again to re-start the transfer. Optionally, you can restart the dive computer as well, but this is not always necessary.
Other USB IrDA Adaptors may work with Dive Log DT if they use the same chipset(s) as the official ScubaPro/UWatec one, but we are not able to support all makes and models of adaptors. If you already own one, you can try it out. If you are thinking of buying another, less expensive adaptor, try to find out the chipset it contains first, and contact us with the information.
(NOTE: The Suunto USB download cable is REQUIRED to be able to download these computers. There is no need to install any drivers - the application will communicate with the dive computers directly)
Plug the USB end of the cable into your Mac and plug the other end into your dive comptuer. Once you insert the Suunto download cable into a USB port on your Mac, the "Download" button will become enabled. Some of the above dive computers will go into "transfer" mode when you plug into it, but others require you to set the dive computer into "Transfer Mode" manually. Check your Suunto User Manual if you are not sure. Select whether you want to download ALL the dives on your dive computer, or select a Dive Date/Time to download after. Select which model of dive computer you have from the popup menu. Then click the "Download" button to start the transfer process. Dive Log Manager will show a progress bar while the dive computer is being downloaded. This list of dives will remain until another download is started so you may import dives in multiple stages if you wish. They will not remain once you Quit Dive Log Manager. If you get an error while transferring, and everything looks like it should be fine. try at least one more time.
(NOTE to D4i, D6i, D9tx users: Suunto has a "new" cable you will need for these models, the original D3,D6,D9 cable will NOT work. The "new" cable should be painted red on the inside of the connector that attaches to the dive computer.)
If you have a 3rd party cable to download your Suunto computer, you must also have a kernel device driver from them for that cable, which provides a serial port for applications to use it. To configure Dive Log Manager/Dive Log DT to use a serial port to download instead of using the Suunto cable, press and hold the Command/Apple key while clicking the Download button (which will be renamed to Configure). Dive Log Manager/Dive Log DT will scan for possible USB serial ports and give you a list which you can select from. If the correct one is not there, you can type in the name of the one you want to use.
The Shearwater line of dive computers use Bluetooth technology to download logbook information so no cables are needed. Your Mac computer must have the builtin Bluetooth support - most, but not all Macs do. Your Shearwater dive computer will need to be put into "Download mode" first before clicking the download button.
The first time you connect with your Shearwater dive computer, it may take some extra time to make the initial connection while the two devices "pair". Once your Mac and the Shearwater have paired, all future connections will happen much faster. If you are already using the Shearwater Desktop software, the two devices may already be paired. Disconnecting from the dive computer, manually or after downloading, takes about 10 seconds to complete.
If using a Petrel, firmware version V12 or higher is required. Petrel dive computers support "selective downloading" which means that initially, just the basic dive date, time, and depth information of all existing dives is downloaded at first. Then, simply select which dives you wish to fully download in the top window, and then click the "Import" button. Once you've clicked Import, then all of the profile information from only those dives is downloaded from the Petrel and imported into the logbook. This method makes the download process much faster as you don't have spend time to re-download dives already in your logbook. Predator models do not have this capability so you will download all the memory each time, and only select the dives you have not yet logged to import into your logbook.
Several brands of dive computers, including Aeris, Genesis, Oceanic, Sherwood, and others are collectively known as Pelagic Systems dive computers. Aeris, Genesis, Oceanic, and Sherwood all sell their download cables separately from the dive computer. It has a USB port on one end, and a connector specific to your dive computer on the other. You will need to find the correct cable for your dive computer.
The connection between the cable and the dive computer is the "weakest link" for these computers. It's very easy to not have a proper connection, meaning that data does not transfer and the download fails. If you are having trouble downloading your dive computer, this is the first place you should check.
If you have a 3rd party cable to download your Pelagic computer, you must also have a kernel device driver from them for that cable, which provides a serial port for applications to use it. To configure Dive Log Manager/Dive Log DT to use a serial port to download instead of using the Pelagic cable, press and hold the Command/Apple key while clicking the Download button (which will be renamed to Configure). Dive Log Manager/Dive Log DT will scan for possible USB serial ports and give you a list which you can select from. If the correct one is not there, you can type in the name of the one you want to use.
(NOTE: The Mares USB download cable is REQUIRED to be able to download these computers. There is no need to install any drivers - the application will communicate with the dive computers directly)
The Mares "DRAK" cable will have an "end" specific to your dive computer that plugs into the "mini USB" side of the cable. Once the entire cable is plugged into your Mac, the "Download" button will become enabled. Select whether you want to download ALL the dives on your dive computer, or select a Dive Date/Time to download after. Select which model of dive computer you have from the popup menu. Put your dive computer into transfer mode and then click the download button. Dive Log Manager will show a progress bar while the dive computer is being downloaded, and then the list of downloaded dives will show in the top window. This list of dives will remain until another download is started so you may import dives in multiple stages if you wish. They will not remain once you Quit Dive Log Manager. If you get an error while transferring, and everything looks like it should be fine, try at least one more time.
If you have a 3rd party cable to download your Mares computer, you must also have a kernel device driver from them for that cable, which provides a serial port for applications to use it. To configure Dive Log Manager/Dive Log DT to use a serial port to download instead of using the Mares cable, press and hold the Command/Apple key while clicking the Download button (which will be renamed to Configure). Dive Log Manager/Dive Log DT will scan for possible USB serial ports and give you a list which you can select from. If the correct one is not there, you can type in the name of the one you want to use.
All of the other features available in Dive Log Manager are of course still available in Dive Log DT. You can Import logbook information from several other formats and programs using Dive Log DT. The main Import Panel will allow you to set configuration options when importing into Dive Log DT as well as giving you online help. Once those preferences are set to your liking, you can click on which format you are importing from. (Importing instructions can also be found on the main "Import" panel)
Currently supported formats are MacDive (http://www.mac-dive.com), MacDiveLog (http://www.macdivelog.com), JTrak (previously from ScubaPro) and JDiveLog (http://www.jdivelog.org), Shearwater (http://www.shearwaterresearch.com), and Suunto DM4 (http://www.suunto.com/us/products/software/suunto-dm4). We can also import standard UDCF files and UDDF files from V-Planner and MultiDeco-X1 from HHS Software (http://www.hhssoftware.com), as well as DAN's DL7 format. (Please contact us for "up-to-date" information on other formats). You can also import from another Dive Log DT logbook if you want to using the "Dive Log" import. You can choose to merge that external logbook information into an existing dive, or you can create a new dive with it - simply set the starting dive number for the operation. Import as many dives at once as you want. When merging data from an external log to an existing dive, we will only selectively overwrite data so you will not lose any information that has already been entered.
Synchronization between the desktop and your handheld device is very simple:
There is a synchronization panel for each iOS device that advertises that it is available. Dive Log DT will automatically recognize compatible iOS devices when synchronization is enabled within the Dive Log iOS app. Dive Log DT and Dive Log use Apple's Bonjour technology to automatically configure the network communications. You may also backup your iOS logbook onto your desktop for safe keeping and for backup purposes.
There is also a manual connection panel for advanced users who use firewalls or work in areas where Bonjour is not available. It is enabled via a checkbox on the main "Synchronize" panel where you will also find detailed online synchronization instructions.
Dive Log DT is available on the Mac App Store today! If you have any questions or problems, please visit the "Contact" page to reach us, or check for additional information in our Forums. If you are looking for a version of Dive Log DT that runs on earlier versions of MacOS, follow this link to Dive Log Manager for more information.